Google sheets do not have an inbuilt feature that allows its users to send their document. Whenever you want to send your worksheet to a third party, it shares the whole document even though you don’t want some parts of your document shared. So we are going to improvise and figure out ways we can exclude areas of our worksheet.
The Design Of a Google Sheet
The Google sheet is a document comprising multiple sub sheets. These sub sheets can range from one to a hundred sheets. This shows how versatile the Google sheet design is. When sharing a worksheet, the entire document is sent which might not be what the sender wants.
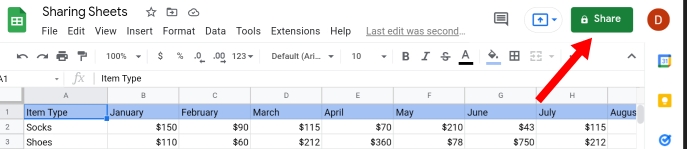
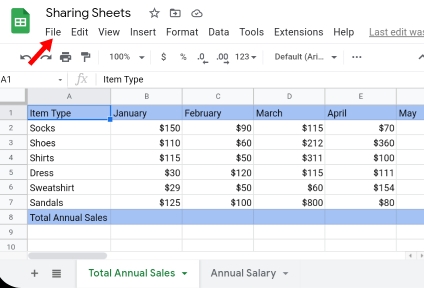
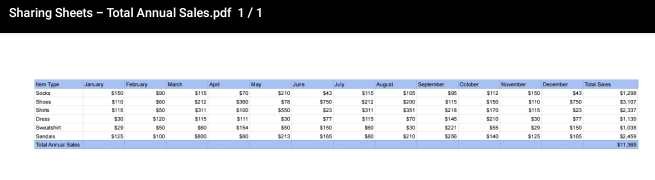
In the sample worksheet below, there are two sub-sheets. One sheet contains details of the total sales made annually by a store and the other sheet contains the salary payment for each staff member that works at the store. Some payments for some workers are higher due to a raise and some are lower due to queries of misconduct at the store.
We would like to share only the sheet containing the annual sales with my business partner and would like to keep the second sheet for reference or personal purposes. Following the steps below, we can share our worksheet.
Step 1: Click on the Share button.
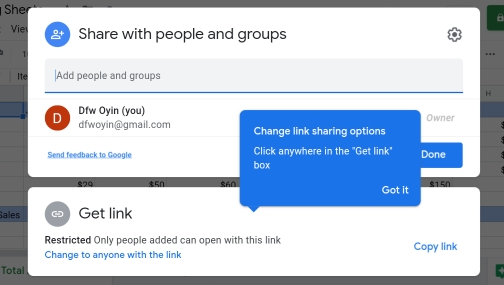
Step 2: Add people or Groups that you want to share your worksheet with or you can get a link by copying and sharing the link with your partner.
This link would redirect whoever clicks on it, to your worksheet.
When sharing, you can select what classifications your partner is. There are three known classifications.
- The Viewer: This classification grants your third party access to view your worksheet. He or she cannot edit or modify and comment on the contents of your worksheet.
- The Commenter: This classification grants your third party access to comment on your document but cannot edit it.
- The Editor: This classification grants your third party the access to view, comment and edit content and data on your worksheet.
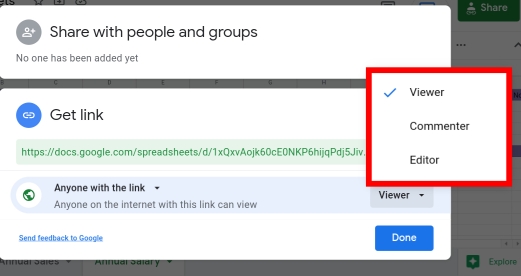
When sharing your document, you should only share them under the classifications of viewer or commenter. If you share your worksheet under the editor classification, you stand a chance of losing important components of your data.
However, you can see if your sheet was modified or tampered with. The changes made can also be reversed depending on how you want it and what you think of the edit made.
This is not advised to do so because it could be shared with someone that isn’t supposed to have your worksheet with them or it could be deleted permanently in the process.
This makes the above steps to share the entire worksheet a big NO. To share one sheet, you have to extract irrelevant data from the worksheet.
How To Link Someone to a Specific Tab in Google Sheets
In the previous topic, we mentioned that a link could be created and shared with your partner. We are going to look into that in detail under this topic.
As we said, the unique link created would redirect the individual to the worksheet when he or she clicks on the link. However, the document displayed might not be what he is looking for.
Here we are going to show you how to link the third party to a specific tab in the worksheet.
Step 1: Select and highlight the entire range of the worksheet.
Step 2: Right-click on the selected worksheet. An array of options is displayed. Click on View more cell actions.
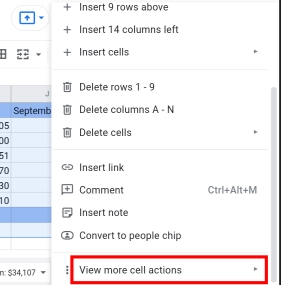
Step 3: A menu of options is generated. Click on the Get link to this Range.
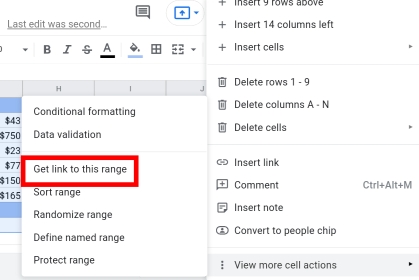
Step 4: The unique link of the worksheet is copied to your clipboard, paste the copied link on the worksheet.
Notice the end of the worksheet ends with gid=0. This is the link’s unique ID number. But we want to share the other worksheet.

Step 5: Click on the sheet we want to share and notice its link ID number ends with gid=907416
Step 3: Input gid=907416 in place of gid=0 at the end of the link you want to share. A unique reference link has been created successfully.
The link redirects the user to the specific tab in the worksheet but the user can view and have access to the other sheets in the document.
Therefore, this stands as a disadvantage of this method. But if you aren’t worried about the third party viewing other data in your worksheet, it is a good method of sharing Google sheets.
How To Protect Your Google Sheet from being Viewed by others
Protecting google sheets is also important for locking the worksheet to prevent it from being altered even though it could be viewed by another user.
When the worksheet is shared, the individual won’t be able to edit or change the data in the worksheet unless the owner of the document creates conditions and grants permission to that certain individual. Protecting google sheets can be done using the steps listed below.
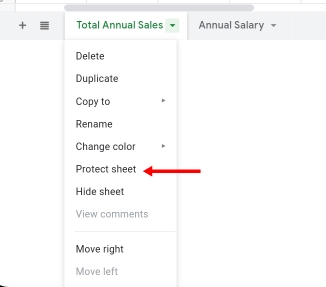
Step 1: Click on the drop-down arrow close to the sheet name below the worksheet.
Step 2: A list of options is displayed. Click on Protect Sheet.
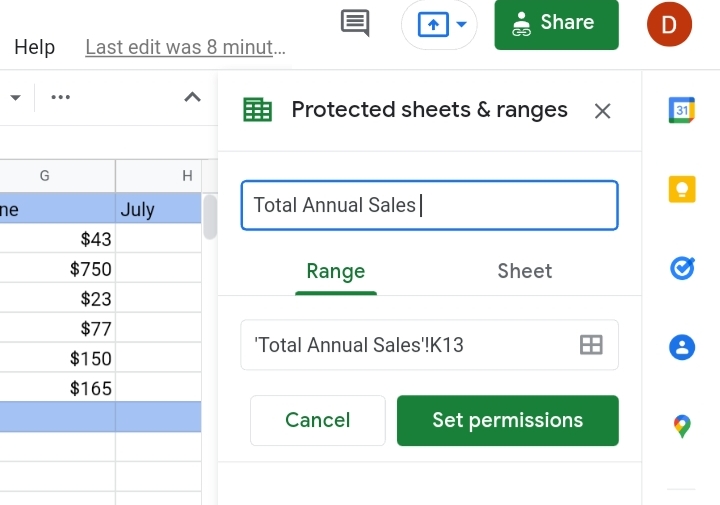
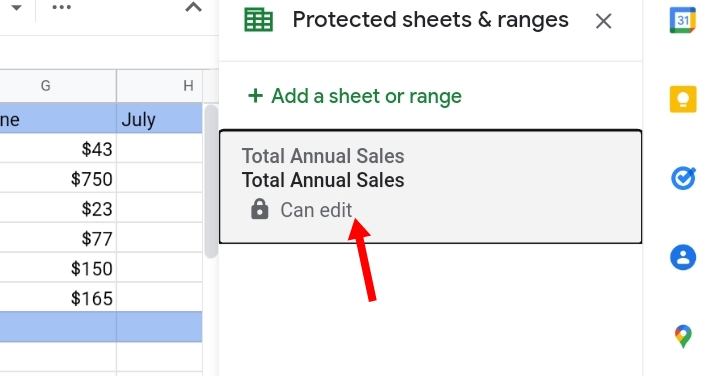
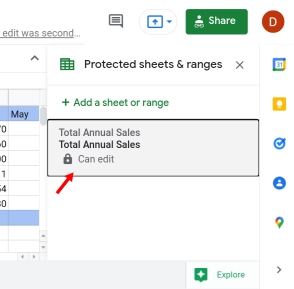
Step 3: A pop up by the right side of your sheet would appear, showing the description, the protected sheets and set permissions.

Step 4: Enter a description. This isn’t compulsory, you can decide to enter one or not. But I decided to enter one, “Total Annual Sales”. Click on Set Permissions.
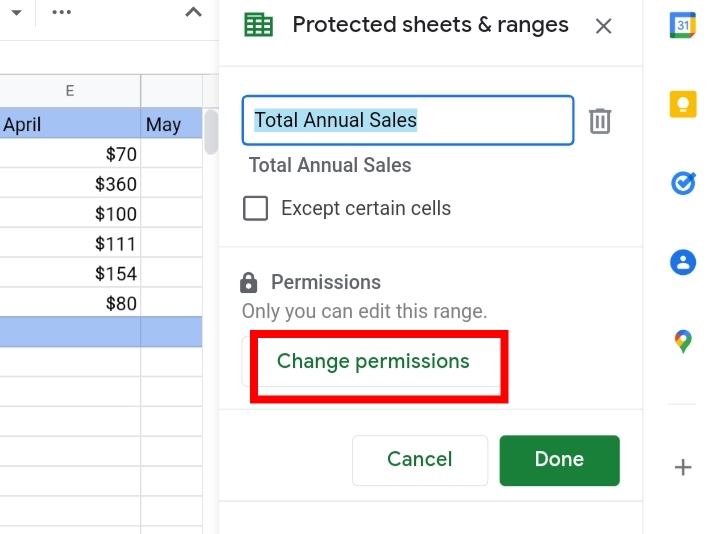
Step 5: Click on Restrict who can edit this range. This setting restricts editing from anyone else who receives your shared document.

Step 6: Input the setting to Only you. This permits only you to edit the spreadsheet. Click Done. Your document has become locked and protected.
If you want to change the permissions to grant access to a selected group of people, here are the steps.
Step 7: Click on Change permissions here to allow access to the individual or group of people who you shared your worksheet with.
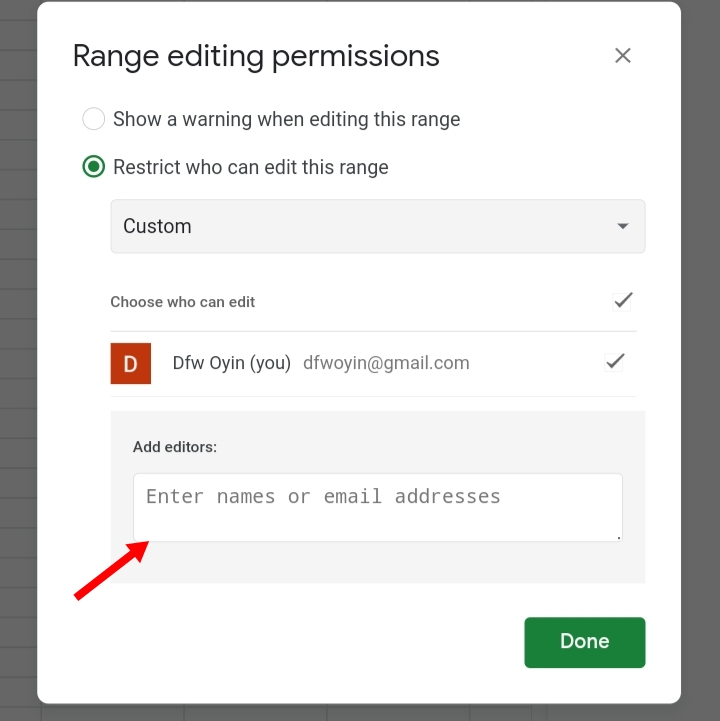
Step 8: Change from Only you to Custom.
Step 9: In the box below, you can add the names or email addresses of the selected people you want to approve to edit your google worksheet.
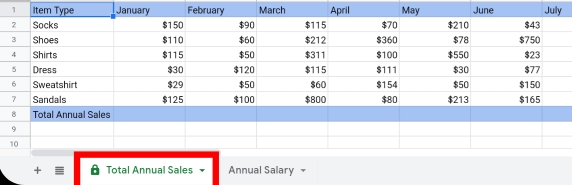
Step 10: You would notice a locked symbol in front of your worksheet’s title. This indicates that your sheet is protected.
This is considered the best approach to preventing unnecessary editing or deleting of important and valuable pieces of data on your worksheet although it can be viewed which doesn’t solve the problem completely.
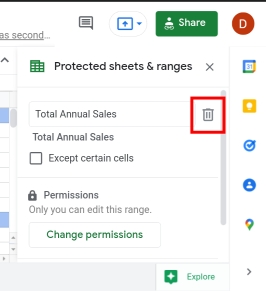
How To Remove Protection In Your Google Sheet
If you want to delete the protection placed on your worksheet, follow the steps taken below.
Step 1: Click on the Protection placed on the worksheet.
Step 2: Click on the Trash can or Dustbin icon by the side of the tab.
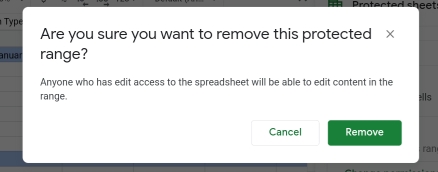
Step 3: A pop-up warning is displayed on the screen asking if you’re sure you want to remove the protection placed on your worksheet.
If you are sure, click remove. Your worksheet can now be edited by anyone who has access to it.
How To Make a New File with One Sheet In Google Sheets
Another method used to share one sub-sheet in your worksheet is by creating a copy of the entire google sheet. This Is done by following the steps stated below.
Step 1: Click on File on the toolbar.
Step 2: An array of options under File is produced. Click on Make A Copy.
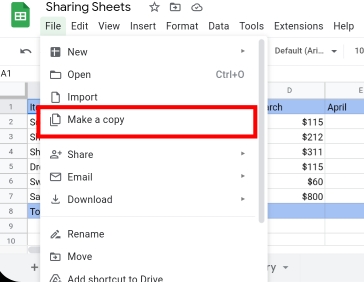
Step 3: A pop-up appears on the screen, indicating the title of the copy and other aspects of the worksheet you would like to copy such as the comments made on the document.
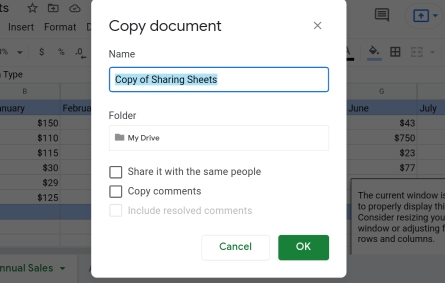
Click on ok.

Step 4: Exit the current worksheet to the homepage where all worksheets and documents are listed. Look at the most recent file below, titled Copy of Sharing Sheets. This indicates that the sheet has been copied successfully.

Now that you’ve successfully created a copy of your worksheet, remove the other sub-sheets then share the copied worksheet containing the sub-sheets you don’t want hidden or you want to share with them. This has some advantages over the other methods because it is more secure and respects the owner’s privacy of the worksheet.
Once the sub-sheets are deleted, you don’t have to worry about what areas of the document are seen or not. However, to every advantage, there is always a disadvantage. As said in the introduction, Google sheets are very versatile and can contain from one to a hundred sub-sheets in a single document.
What happens when you only want to share twenty out of a hundred sub-sheets with another user. Copying and deleting each sheet at a time would be a total time waster, cause strain on the eyes and brain, may cause fatigue, and become aggravating.
Therefore, this method is not suitable when you don’t want to share large data sets with another individual.
How to Export Your Google Sheets Page
This method solves the disadvantage posed by the previous method. This method is preferred when you want to copy multiple sub-sheets in your document; however, the original sheet remains until you delete them. This is done by following the processes listed below.
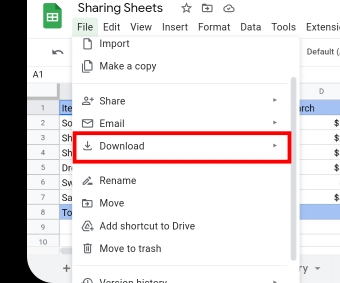
Step 1: Click on File on the toolbar.

Step 2: A list of options is displayed. Click on Download.
Step 3:A list of download formats is produced. Select the download format as a Pdf document.
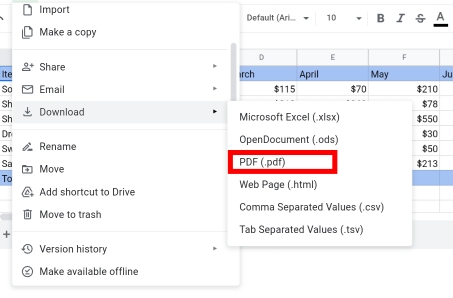
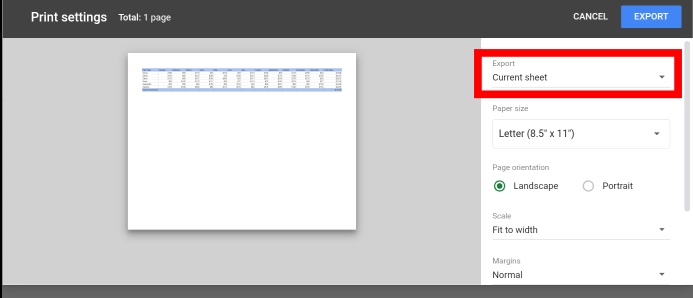
Step 4: A pop-up is shown on the side of the sheet. On top of the pop-up, the Current Sheet is stated. This means that the current sheet is only exported.
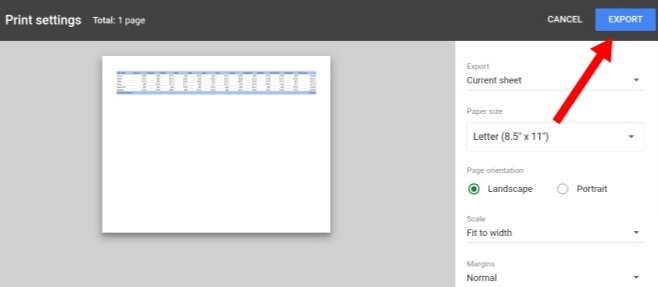
Step 5: Click Export.
Step 6: The document is downloaded as a PDF file and saved internally.
How To Print The Sheet In Google Sheets
Instead of worrying about the sheets you don’t want others to see or your entire data being tampered with, edited or deleted, you can always print out the particular sheet you want to send and hand it out to whoever you want physically.
You won’t have to bother about what and who can edit your sheet anymore. This is considered the best method for preventing unnecessary edits and eliminating important data while you share your sheet with anyone.
With the steps below, you can print out your worksheet successfully on your own.
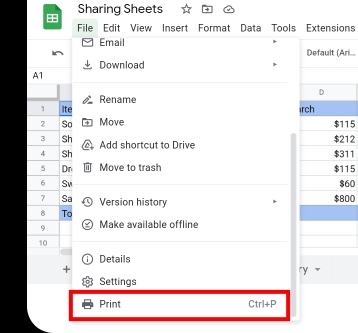
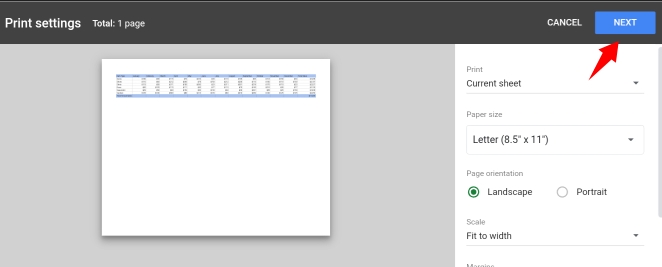
Step 1: Click on File on the toolbar.

Step 2: Click on Print or Ctrl key + P.
Step 3: For this to be done successfully, ensure your computer or laptop is connected to a functioning printer. Click Next, and your sheet is downloaded as a PDF file. Then, select the file from the internal storage of your device and print it out in hard copy.
Final thoughts
Although Google doesn’t have an inbuilt feature for sending specific parts or tabs of data. With the few improvised methods, we hope they can achieve your desired results. We hope you found this guide helpful. Thanks for reading.


