Google Sheets is a versatile spreadsheet tool that could be used in a variety of ways to achieve some impressive results.
Calculating time is one of the many things you can perform with Google Sheets. It is easy to add time, remove time, and even generate a timesheet to estimate hours worked using Google Sheets.
In this blog post, we will describe how to use Google Sheets to compute time. We will explain how to add/subtract time to perform various time calculations.
How to Calculate Time in Google Sheets
Before we get anything out of time estimation in our Google Sheet, we need to make sure that our cells are structured as time.
To structure your cells as time, follow these steps:
1. To begin, choose the cells you would like to format as time.
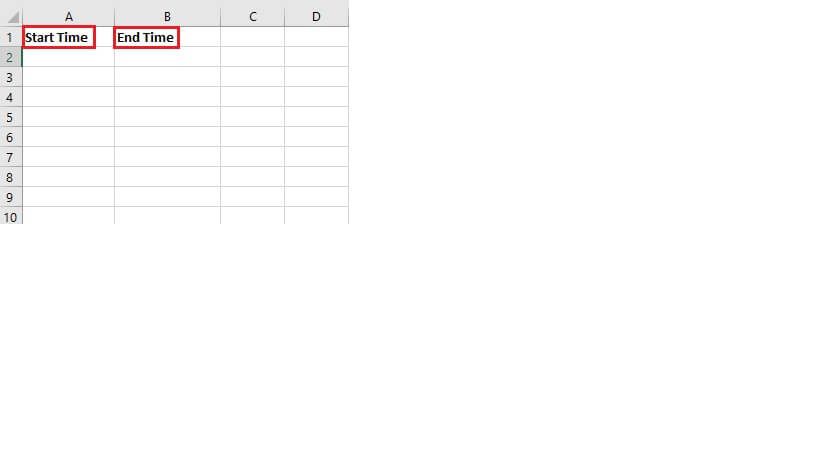
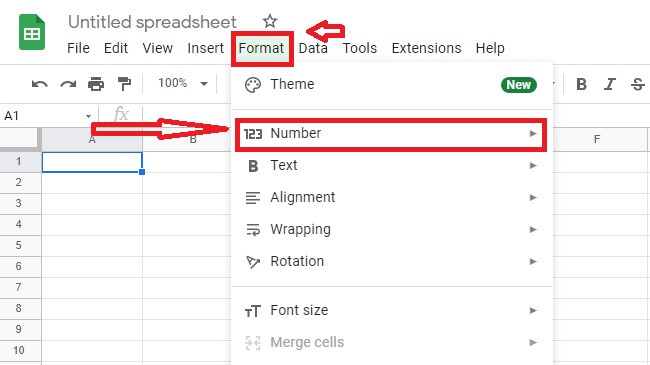
2. Select Format>Number from the top menu.
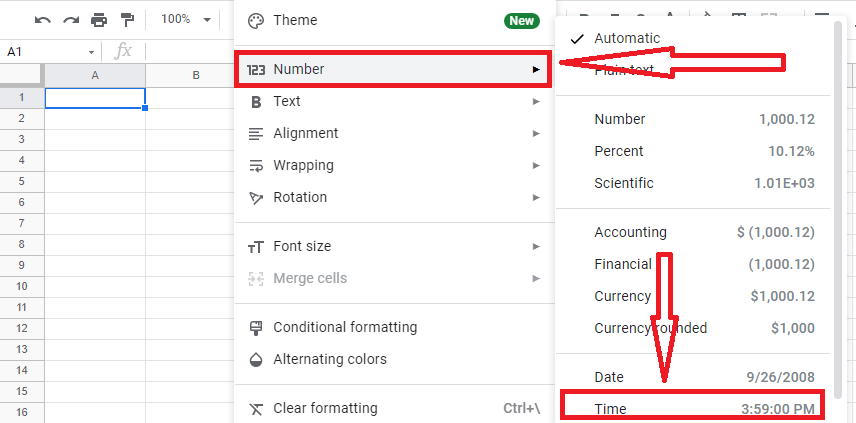
3. Pick “Time”
4. Now you can type numbers into your cells, which will be represented as time.
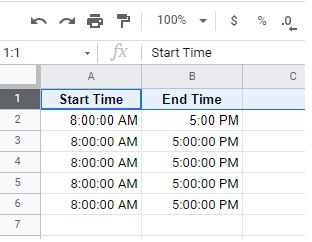
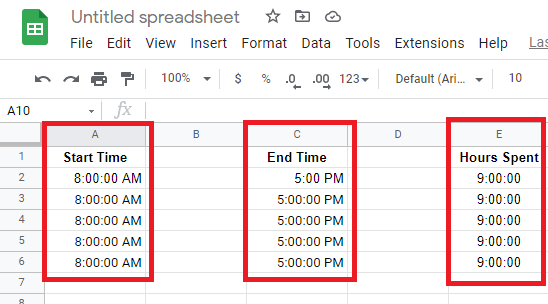
In our instance, “Start Time” begins at A2 in column A, while “End Time” begins at C2 in column C. In column E, you’ll find the number of hours you worked.
Calculating could not be simpler if the formats were appropriately established. Use the formula ‘=(C2-A2)’ to solve the problem.
This formula calculates the amount of time that has passed between these two cells and presents it in hours.
You can make this calculation much more complicated by including dates. If you work hours that last more than 24hrs or involve two days in a shift, this method will come in handy.
How to Add Time Gaps/Work Breaks When Calculating Time?
It’s useful to know how to include breaks in your timesheet when calculating employee hours completed. Lunch breaks can be incorporated into work hours in a variety of ways.
Please follow the following instructions to add work breaks in your Google Sheets.
1. Construct the Break Start Column & fill in the cells with all of the breaks.
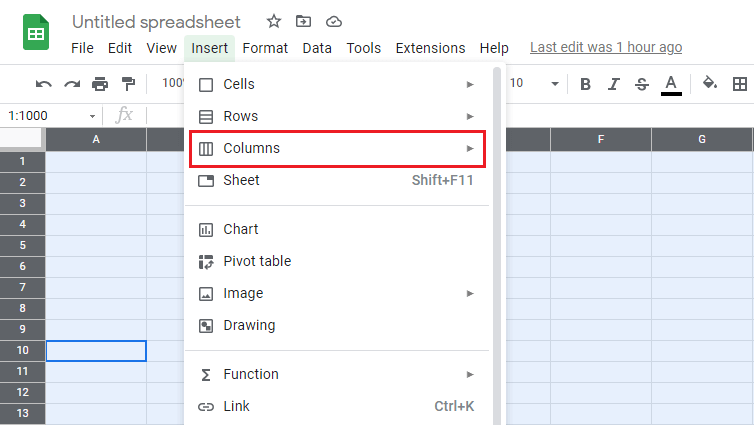
Since Google Sheets manages the rest, you may keep the column style set to automatic.
2. Add a Break End Column and set the formatting to automatic.
3. Determine the number of hours worked in the Hours Worked Column. As a result, E2 = (D2-C2) + (B2-A2), which equals “Break Start” – Time Start” + “Time Out – Break End” = Hours Worked throughout the day.
To make your Hours Spent Column appear, repeat the computation for each row.
How to Convert Time to Fractions/Decimals?
If your database contains time and date values, you may need to transform them to decimal integers in some cases.
For instance, you could want to transform the difference between a task’s start and finish times to a decimal number.
This can be used to calculate the amount of worked hours. It’s sometimes more obvious to state 4:35 hours worked rather than 4:25 hours worked. It also comes in handy if you need to use the significant difference in other calculations later.
As a result, knowing how to convert time information into decimal numbers indicating the number of hrs, mins, or seconds is quite useful.
Using Hour, Minute, Second Functions
Hour Function
This function takes a time value and returns its hour component. If you provide this function with the time value “04:15:30,” it will give 4, because there are four hours on the mentioned day. The syntax is as follows:
HOUR(time)
Time is either a time value or a link to a cell that has a time value in this case. Surprisingly, you may use this function to pass the digit representation of the time and get the proper number of hours.
Minute Function
The minute element of a time value is returned by this method. If you provide this function with the time value “04:15:30,” it will give 15, as there are 15 mins in the time. The syntax is as follows:
MINUTE(time)
Time is either a time value or a pointer to a cell that has a time value in this case. You can also pass the time as a numeric representation.
Second Function
This function accepts a time value and outputs the value’s subsection. If you provide this function with the time value “04:15:30,” it will give 30, as there are 30 sets in the mentioned time. The syntax is as follows:
SECOND(time)
Time is either a time or a link to a cell that has a time value in this case. You could also pass the time as a numeric representation.
How to Find the Shortest Amount of Time Worked?
This method might be useful if you need to pick the least length of time worked rapidly. The MIN() operation is a built-in function for finding the smallest value in a series of numbers.
Establish a separate cell and name it ‘Whatever you want to name’, then add the function to it as follows:
‘=MIN(E2:E12)’

The Minimum Hours Worked Column must be in the required format if you followed in the footsteps.
The MAX() or MIN() functions can be readily used for a column or set of cells. Give it a shot and see what you think.
How to Make a Time Sheet in Google Sheets
We can also generate a timesheet in Google Sheets using all of the techniques we’ve learned in this blog.
To create a timesheet, we’ll start by creating a simple design with all of the columns we’ll require.
Just make sure the template of every column is up to the mark and is in the exact format that is required.
The following is how each column should be formatted:
- Start Time – Column B – (Time)Break – Column C – (Duration)
- End Time – Column D – (Time)
- Hours Spent – Column E – (Duration)
Once the cells are in the required format, you can enter all the data that is required to be inserted.
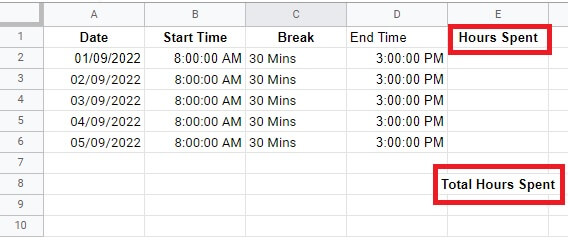
You may then set up your equations to determine the hours Spent and total hours spent once your check-in and check-out times have been input into your spreadsheet.
To compute the number of hours worked, we’ll use the formula “End Time – Start Time – Break.” This will appear in the mentioned spreadsheet as:
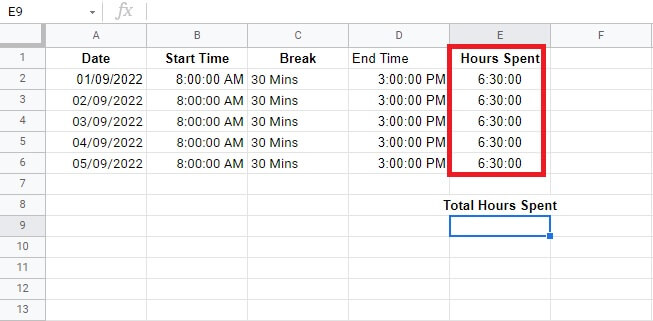
How To Calculate Total Hours Spent
We can compute the Total Hours Spent by combining all of these data after we have in the hours spent:
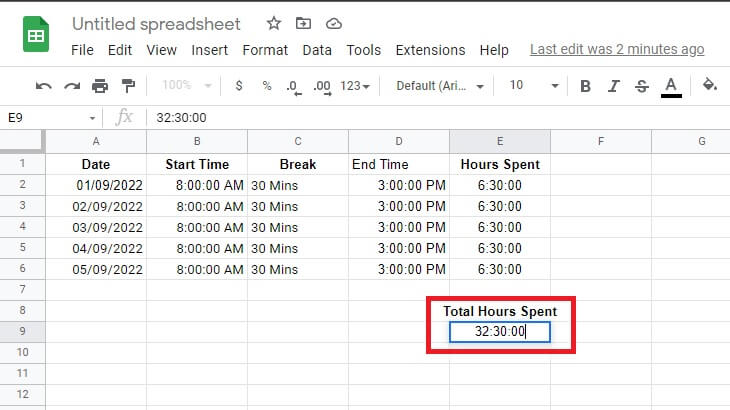
This way you can create a Timesheet in Google Sheets. With this template, you can manage your business and estimate payrolls according to the hours spent by your employees.
Conclusion
Although Google Sheets was not designed to generate timesheets, it can be simply configured to do so. This basic configuration allows you to keep track of your working hours fast and effortlessly.
Things get a little more difficult when periods exceed 24 hours, but Sheets can still handle it by switching from Date to Time layout.
This tutorial should have been beneficial to you. If you like this article, be sure to read all of our articles to learn more about how to get the most out of your favorite technology devices and techniques.


